Search This Blog

Thursday, June 30, 2011

Little Toot Mini Album

Hi there!  Sorry about the lack of posts lately, but between my 2 year old hitting the terrible twos, and my now 4 year old hitting the terrible twos (x 2), and blogger having a little hissy fit, I haven't had much success in finding time to post :)
Naughty blogger I am hey!
Today's project is a little mini album which I created using the new "Little Toot" papers from Kaisercraft.  It's a gorgeous earthy toned collection, with motifs to suit little boys and their toys! 
I used a Kaisercraft scalloped album, which I painted brown to start with, and then covered with paper from the 6 1/2" paper pad. 
I then used little bits and pieces from the paper pad, journal tabs and printed chipboard shapes to decorate the inner pages, with lots of pictures of my gorgeous nephews at play. 
Quick, simple, and believe it or not, it was completely finished in 1 1/2 evenings. 
 Hope you're having a fabulous week! 
x Rita

Sunday, June 26, 2011

Winner winner chicken dinner!

Sorry about the delay, I've had a huge week, so sorta forgot to fix this up :)
According to Random.org, our winner is comment number 2! 
Congratulations Marie (Magic and Drudgery)!!!
If you can email through your address to rita.c.fisher@gmail.com I'll pop your prize in the post early next week!
Have a great weekend!

Tuesday, June 21, 2011

100th post!!!

Yay! 100 blog posts! 
And to celebrate, I think I might just do a little giveaway! 
In the comments section, tell me a little something about yourself, and I'll pop you in the running to win... something! 
Ok...  I'll let you pick... A handmade string of chalkboard fabric bunting!  So you can personalise it with your own message whenever you like! (I'll be doing a blog entry on a string of this this week sometime!) or.... a ruffly apron to wear when you're being fabulous in the kitchen!   Winner's choice!
This competition is only open to followers of my blog, so if you're not a follower, join up! Right now the odds of winning are pretty good!
Also, I'm happy to post this prize overseas too, so it's open to everyone, not just my Aussie readers! 
I'll close off comments on here at 7pm Saturday 25th June 2011, (That's Queensland time!), so make sure you enter before then!

Sunday, June 19, 2011

Rick Rack Roses Tutorial

I saw these little guys on pinterest, and HAD to rush out and buy some rickrack to try this!!!  They are just so adorable!
For each rose you'll need around 12" of rickrack, but it's easier to make a bulk lot of them.  I bought 2 metres of each colour, cut them in half and sat down in front of the telly to weave them together. 
I ran the smaller two colours through the sewing machine (more to one side) to lock the two strands together, but I forgot to on the jumbo rick rack, and it held up fine. (I sewed in pink so you can see it easier!)
I think it would add strength for if you want to put the roses on clothing or a handbag etc, but for decor or papercrafts, leaving out the stitching bit should be fine. 
 
 Then it's as simple as pinching one end, and rolling it up!  It will form into a bud, and then as you keep going, adding a dot of hot glue here and there, you'll end up with what almost looks like an artichoke... 
When your rose is as big as you'd like it to be, cut the tails off the rickrack, and glue the end underneath the flower.
Fan out the petals with your fingers, as much or as little as you like. 
Just gorgeous!!!
Now, go try make this, it's easy, I promise!
For an indicator of size, the biggest rose was made with jumbo rickrack (20mm wide), the cream was just the standard rickrack,  (12mm), and the little red one was with baby rick rack (8mm).  I think the larger ones are a lot easier to work with, but the tiny stuff makes for super sweet little rosebuds :)
Hope you all had a fabulous weekend!
x Rita

Thursday, June 16, 2011

Little Monsters for your handbag!

I stumbled across this idea on a picture gallery online - and I loved it so much I just had to recreate it.  I wish I could remember where it came from so I could give due credit, but I can't.  If anyone knows where it came from, please let me know so I can add the link here!
This little guy is a felt pouch for storing tampons in your handbag. 
He makes me smile :) So I hope he makes you smile too.
He's made from a rectangle of felt with two circles sewn on, folded unevenly to make a pouch, and then blanket stitched along the edges.  I used two blue cabochons as eyes, cos they looked cheeky :)  (excuse the dodgy iphone photo!)
He holds 6 tampons, and when you're not giggling at his fangs, you can pop them back inside to hold them securely in your bag or pocket. :)
Cute hey!
x Rita

Wednesday, June 15, 2011

Some detail, and a layout!

 Here's some detail shots from my store window display.  The strawberries...
 lollipops...
 And the teapot, teacup and mini cupcakes. 
I added a label onto my lolly jar, which reads "Boiled Sweets, 10c!)

 To bring the whole scene back to the business of the store, we needed a layout.  Conveniently, we've just had a birthday in the family, so the doodlebug designs papers really lent themselves to my birthday photos of Stephie blowing out her candles. 
The layout is framed in a Lulu's frame.  (Aren't they a gorgeous way to display your favourite layouts?) 
Now... onto my next big project... catching up on my project life! :)

Tuesday, June 14, 2011

Look at my underwear!

Hehe... well, not really.  Technically, yes, it's mine, but I bought it specifically to "bling up" for a competition that's running in Townsville at the moment.  There's a production coming up, titled "Breast Wishes", and as part of the promotion, there is a competition to "bling your bra!". At the end of the competition, the bras will be auctioned off to raise money for the Breast Councer Foundation. 
This bra is my entry :)
Approximately 2000 rhinestones have been applied by hand to this (I don't have a heat setter, so I went the old fashioned way, using helmar gemstone glue, and flatback rhinestones).
In the pale pink is the breast cancer foundation ribbon on one cup, and on the other cup is the word "hope".  I'm planning on using some alcohol inks to colour the pale pink rhinestones a little bit darker, but that'll depend on the test run that I've got planned.
I'm really happy with how it's turned out, so blingy, sparkly (and hard to photograph! hehe... I suppose that's what you get when you go nuts with a giant stack of rhinestones!).
Hope you're having a fabulous week!

Monday, June 13, 2011

My big project!

First of all, please forgive the dodgy iphone photos.  I intend on going back with my good camera and taking some decent shots of all of this next week :) 
My friend Michele, who owns Scrapbook Shenanigans in Townsville, asked me if I'd be interested in dressing her windows.  I jumped at the challenge, and immediately decided that I wanted to do a sweet shop/tea party theme. 
So, over the last few weeks, I've spent my nights creating a teapot, teacups and an array of goodies for my little tea party... without further ado, here's some photos!
 It's fun trying to take pics through glass :o 
 The bases for my little mini cakes :)
 Lots and lots of lollies!  These were made using a little circle of paper, covering them with tape, and then coiling some colourful twinery twine around and around and around and around....  and then wrapping the lot in cellophane!
 Here they are in their cute little jar.  I added some pearls to this before it went into the window.  In the background you can see some itty bitty little strawberries that I made as well :)
 The cake stands, before adding the patterned paper skirts, and decorating the cakes.  These were made by threading polystyrene balls onto a skewer, which I glued onto a little base, and topped with an old ribbon reel.  I added paper trims to hide the ugly bits later on though. Aren't the colours fun though! (and isn't my desk a disgrace!)
 Teeny tiny cupcakes... calorie free!
 I made a stack of rosettes to hang from the undersides of the shelves.  They looked so pretty on my desk I wanted to keep them there! :)
 Close up of the detail on the rosettes - I used a fiskars border punch to create this look.
 Getting there slowly, decorating the cakes and their stands...

 And that's it for now, until I'm able to get back in and get some better detail photos with my good camera.  There's SO much more on display, so click on the last two photos to try and see a bit more detail :) 
Hope you likey!
x Rita

Wednesday, June 8, 2011

Doily Pom Poms Tutorial

If you've found this page through google, it's probably because I wasn't able to find a tutorial for these, so made up my own!  I saw a picture of them, fell in love, and madly googled for a tutorial, but to no avail...
(and if you're a first time visitor here, welcome! If you like what you see here, become a follower, and keep updated with all the little things I make!)
First of all, for this project, you'll need 12 doilies of the same size.  I used small ones for this project, just the cheapie paper ones are perfect.  If you like, you can dye your doilies using a concentrated dip of food colouring and water, and then leave them to dry completely before starting.
If, like me, you're impatient, you can decide that you love the look of white ones, and get cracking! 
Take 6 of your paper doilies, and pin them together in the centre using a brad (paper fastener).  Now gently cup the first layer of doily into a tight little flower.
Repeat with each of the first 3 layers.
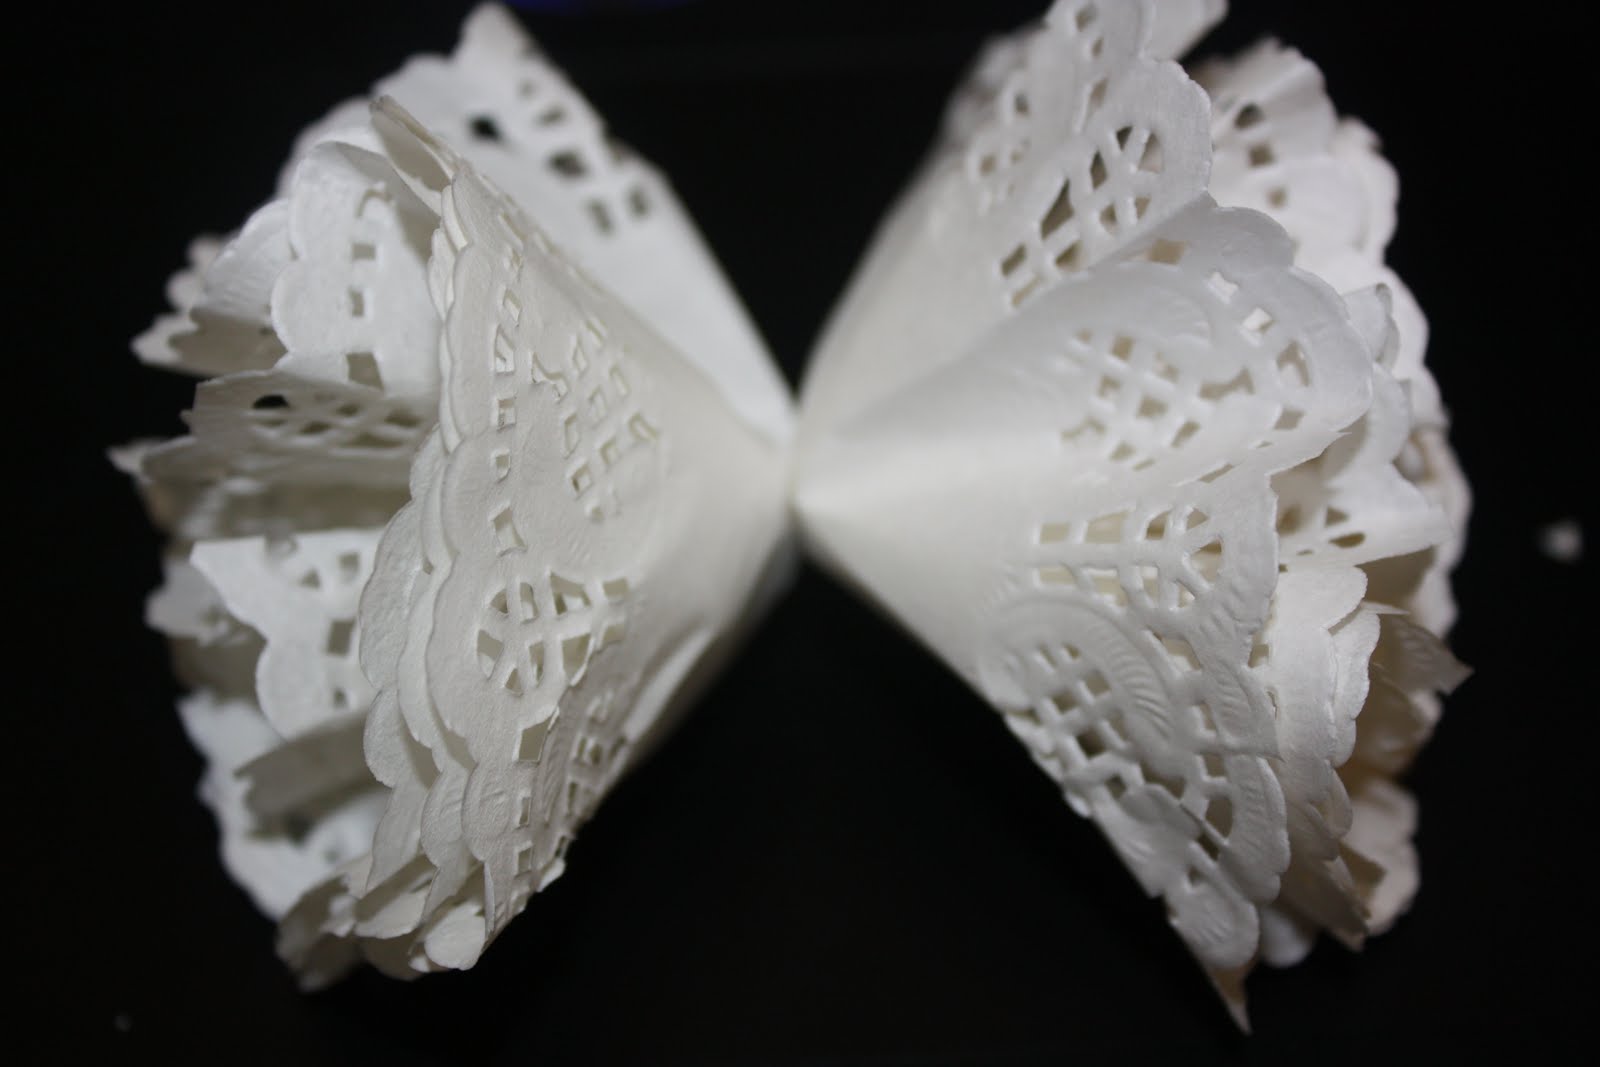
Turn the stack over, and start from the other side, exactly as you did before.  You'll end up with something that looks like this...
Taking your remaining 6 doilies, repeat the process, until you've got two ruffly little pieces.
Now, take a piece of string, and tie the two halves together through the centre.  This string will be your hanging string too, so if you want to be all pretty, a piece of ribbon or coloured twine would be perfect.
Finally, fluff the pom pom up with your fingers until you're happy with it!
Now rest on your laurels while everyone else admires your fabulous doily pom poms!
 (forgive my dodgy background, I'm in a bit of a hurry tonight!)
 If you were making a larger one of these, you might consider using a few more layers if it doesn't look full enough.
I sprayed mine with a little bit of pink glimmermist to add some shimmer, though you can't see it very well on the photos. In this last photo, the doilies are a bit damp - once it dries I will be able to fluff them up some more :) 
Happy making!
x Rita

Monday, June 6, 2011

Making, baking...

This weekend we had an early birthday party for our youngest daughter, who turns 2 on the 13th.  She's mad about pigs, so I decided to make her a pig themed cake! 
The cake was a chocolate cake, with a vanilla buttercream frosting.  (and the mud is a chocolate buttercream). 
I made the little piggies and ducks from fondant, which I coloured with food dyes and moulded by hand.  It's so much fun, like playdoh for grown ups! :)
It was a bit of a hit :)
I also made a stack of cupcakes, but forgot to take photos of them before the kids demolished them! (bad blogger!).  Here's one that I caught before it disappeared into the birthday girl's tummy :)  (It's missing one ear, and the photo's blurry, but I tried!) 
 
 Hopefully I'll be back to regular posts by wednesday! And then I can reveal what I've been busy doing!
Hope you're having a fabulous week!