Search This Blog

Tuesday, January 8, 2013

My new Craft Space!

Today I'd love to share with you all my new craft space!
As some of you know I disappeared from the blogging world last year as I was running an online store, and there's only so many hours in a day. This year, things are getting back to a little more normal hours - I'm still working outside the home, which means it's even more important for me to have my little space where I can create to soothe my soul.
Without further ado... the big unveil!
  
All my goodies are within easy reach, and organised like nobody's business! Which is a tad ironic, as i'm a little on the more "creatively organised" side in real life hehe... 
Thats one of my two daughters cute little feet poking in on the side of the photo, and my little Rizzo baby hiding under my desk :) (or, his desk, as he likes to think of it). 
 
On the wall beside the paper rack is this wall hanging - Michele and I created it to use as a display piece for the craft fair,to showcase the different Tim Holtz colours.  We diecut the dress form and cotton spool from grungeboard, and then crackle painted them using Tim's Black Soot and Antique Linen crackle paint.  Each block features a single colour, applied onto white cardstock.  The coordinating stain was used to dye some of the fancy trimmings to the correct shade, as well as a strip of muslin.  This makes it a gorgeous way to colour match to my distress inks, and also illustrates the depth of intensity that the stains provide on different fabrics. 
The background is made by mod podging a few good strips of Tim's tissue wrap, allowing for a slightly scrunched finish. 
I love how colourful it is, and it makes me use my inks a LOT more than I did before!
(The colours on the last three are from the seasonal collections, which don't have matching stains).
What do you think of my little space?
Is there any elements you'd like a closer look at?
x Rita

Monday, January 7, 2013

Thinking of you - featuring Cut/Fold/Tuck dies!

I've had this sweet little set of dies hiding in the back of my stash for a little while now, and honestly don't know why I took so long to play with it!
It's the Spellbinders "Floral Burst" Cut Fold Tuck die, which consists of three separate dies, each with ornate cuts throughout. 
I used a piece of single side printed paper, as I wanted the contrast of the white on the pattern when i folded.  I forgot to take a photo of the largest layer (bad blogger!), but here are the two smaller layers...
They were a bit fiddly to remove from the die itself, but a craft pick or a sewing pin can assist there. 
Simply take the boomerang-ish shaped pieces and fold them back against the paper, and then tuck it under the "tongue" left by the raising of the one previous. 
If that isn't' confusing to explain, I'm not sure what is! :)
So this is all three layers tacked together.  Pretty hey! And seriously took me about 7 minutes from start to finish... And because I *HAD* to use it right away, I used it to make a quick card.  For this card I used cream puff Bazzill cardstock.  The patterned paper is "Junk" from the Kaisercraft Miss Match collection, which I edged using Vintage Photo Distress Ink.
I used a "Thinking of you" Stamp from a Stamp it collection which I absolutely adore! :)
And to top it all off, I finished it with a small Kaisercraft Sparklet.  Just beautiful! 


P.S. I love to get comments from you all, however due to the volume of spam comments that I have to deal with each day, I haven't got too much choice other than to turn on the "log in to comment" doover.  I hope you all don't mind, and still pop a comment in from me from time to time!
x Rita

Saturday, January 5, 2013

Birdie Cards

I thought I'd get the new year started by topping up my card collection - It's so handy to have a stack of premade cards, ready to go at a moments notice. I'm a notorious last minute card maker, and often am dressed and ready to go to a kids party, and realise just as I'm hurtling out the door that I've forgotten to make a card... oops! These little guys took next to no time to create, and are fun and bright enough to keep any little girl happy! Best of all, these cards were made using scraps I had lying around :)
Cute and thrifty - what's not to love!

Sunday, December 23, 2012

I'm BAAAAACK!!!!

Whew... what a whirlwind year.  It's had more ups and downs than the average rollercoaster, yet here we are... only a couple of days out from Christmas, and ready to get cracking into 2013.
Time to give my poor neglected blog a bit more attention in 2013 I think!
I haven't had an entirely unproductive year though, I've gone back to full time work, and am juggling the challenge of working, parenting (my big girl is in grade 1 next year, and my baby is in pre-prep (kindergarten)... time flies!) and somehow squeezing in a bit of scrappy time as well...
Hopefully what we'll see in 2013 is a bit of exploration in creativity, with loads of quick cute projects - I've got my craftroom happening again, so i have no excuses!
I hope I'll see you around here in the coming months, thanks for still checking out my blog while I've been gallivanting around :)
Much Love to you all
Rita

Monday, April 9, 2012

Hi there everyone! Long time no see!
I have been flat out working over on the online store (at www.scrapbookshenanigans.com) but have been feeling a little bit sad that I'd stopped sharing my makings with you guys too! 
Life at the moment, well, with my big girl being off to Prep now, and miss 2 1/2 all of a sudden deciding that she's "grown up" has been hectic to say the least! I haven't had nearly as much time as I'd like to spend creating stuff, but I did make a wedding cake this week (with the help of my sister!)
A family friend was getting married, and she wanted her wedding cake to be gluten free - no cake decorater in the area was able to do that.  So me and my big mouth stepped in...
It wasn't too bad though, we made a gluten free fruit cake, iced it in a layer of rum buttercream (seriously to die for!), and then topped it with a layer of satin ice - a new variety of fondant that tastes incredible, and is so easy to work with!
This is how it turned out!
(that's my sister in the green apron, I'm in the red)
here's the beautiful bride and groom....
and the cake at the reception. 
It wasn't perfect, but it was completely gluten and dairy free, and delicious!
x Rita

Monday, September 5, 2011

Hi everyone! I'm so incredibly sorry that I've been a bad blogger and totally neglected my blog for so long!
Though... I feel I do have somewhat of an excuse! 
I've returned to the workforce, in the best possible way -doing something that I love!
You see, I've been a very busy little girl, learning loads, and creating
www.scrapbookshenanigans.com 
A brand new, online scrapbooking store with all the latest and greatest products (and lots of old favourites too!), all at great prices. 
I'm getting started on doing a blog for the store as well, where I hope to continue on where I left off this year, with lots of fun projects and ideas to share. 
If you'd like to join me over at the new blog, follow http://scrapbookshenanigans.blogspot.com!  Or if you're in Australia and are keen for a spot of shopping, pop onto www.scrapbookshenanigans.com and keep me in a job! :) 
We haven't activated overseas shipping at this point, because we have literally just gotten started - though if you're overseas and see something you MUST have, just send me an email at scrapbookshenanigans@gmail.com and i'll be in touch to work something out :)
Thanks for staying with me through my extended break, but I am back now, and busier better than ever! :)

x Rita

Sunday, July 3, 2011

Paper Rosette Tutorial

Ok... Here goes attempt 2 at this post.  I wrote this all up and scheduled it to post on Friday, and blogger kindly at it on me.  Needless to say, I was a little bit grumpy with it, so I have left it until now :)  
Let's hope it posts better this time.  
Little rosettes are a huge trend at the moment, but are so simple, quick and cheap to make yourself, that it seems a bit wasteful to spend your hard earned craft cash on premade ones that don't *quite* match your project.  Here's a little tutorial on how to make your own rosettes with some leftovers from your stash! 
First of all, cut a 1 1/2 inch wide strip of your desired colour, and score at 1/4 inch intervals.  If you're making multiple rosettes, score the whole page first, and then cut into 1 1/2 inch strips. 
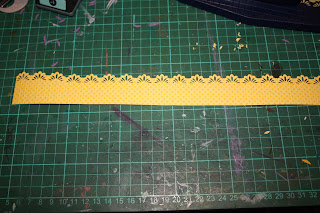
If you desire, use a border punch to punch the edge of your page.  Completely optional, and if you don't have a border punch, you can always dig out those fancy edging scissors that were all the rage a few years back.
Looks pretty, especially compared to my feral (much loved and well used) craft mat...
Concertina fold your strip...
Then glue the ends together to make a circle.  I like to use Helmar Professional Acid Free glue - it's nice to work with, and is quite quick drying, which is important when you're impatient like me :)
Punch 2 circles from some co-ordinating paper (or the same, if you like!).  You can use a button or whatever you fancy here, but it's easiest to use a paper circle for the back one, at least.  Smear them with glue...
Then line up your circle, and gather the straight edge into the centre.  Pop it over a gluey dot, and press down firmly for a few seconds to let the glue grab. 
Slip the other gluey dot onto the top of the rosette, hold for a few seconds and then you're done!
Don't mind the blurry photo here, but I decided to glue the rosettes to a stick, to make a fun bouquet for the local show display.  They alos look great strung up on twine, fishing line or ribbon, as well as just used on a page or card as a cute little embellishment.  When they're finished, the rosettes are about 3" across, so you can adjust the size down as you like.  If you'd like to make them bigger, you'll need to use 2 strips of paper, joined together after you concertina the strips.  
Now... lets hope blogger doesn't eat this post, or I might well give up in disgust!  
Hope you had a great weekend! 
x Rita